ChevyParts
My Garage
My Account
Cart
OEM 2000 Chevrolet Monte Carlo Shock Absorber
Suspension Shock Absorber- Select Vehicle by Model
- Select Vehicle by VIN
Select Vehicle by Model
orMake
Model
Year
Select Vehicle by VIN
For the most accurate results, select vehicle by your VIN (Vehicle Identification Number).
2 Shock Absorbers found


2000 Chevrolet Monte Carlo Strut Part Number: 88965467
$109.69 MSRP: $212.92You Save: $103.23 (49%)Product Specifications- Other Name: Strut Assembly, Front Suspension; Complete Strut and Shock Absorber Kit.; Strut, Front And Rear Suspension
- Position: Front
- Replaces: 22064733, 22064793, 22064745, 22064754, 22064750, 22064755, 22400002, 22064717, 22064784, 22064716, 22064774, 22064707
- Item Weight: 12.70 Pounds
- Item Dimensions: 24.3 x 9.6 x 7.6 inches
- Condition: New
- Fitment Type: Direct Replacement
- SKU: 88965467
- Warranty: This genuine part is guaranteed by GM's factory warranty.

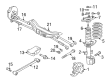
2000 Chevrolet Monte Carlo Strut Part Number: 88965469
Product Specifications- Other Name: Strut Assembly, Rear Suspension; Complete Strut Kit; Shock Absorber.; Strut, Front And Rear Suspension
- Position: Rear
- Replaces: 22064710, 22400003, 22064747, 15846384, 22064752, 22064751, 22064736, 15846385, 22064753
- Item Weight: 14.80 Pounds
- Item Dimensions: 9.3 x 8.3 x 25.2 inches
- Condition: New
- Fitment Type: Direct Replacement
- Require Quantity: 2
- SKU: 88965469
- Warranty: This genuine part is guaranteed by GM's factory warranty.
2000 Chevrolet Monte Carlo Shock Absorber
With a comprehensive array of OEM 2000 Chevrolet Monte Carlo Shock Absorber, from fuel pumps to door handles, our website is a one-stop-shop for your needs. All our genuine 2000 Chevrolet Monte Carlo Shock Absorber are backed by the manufacturer's warranty and are offered at competitive prices in the market. Rest assured, you can shop with complete confidence.
2000 Chevrolet Monte Carlo Shock Absorber Parts and Q&A
- Q: How should you safely handle gas charged shock absorbers during maintenance on 2000 Chevrolet Monte Carlo?A: Safety glasses must be worn for center punching and drilling a shock absorber tube because gas charged shock absorbers contain high pressure gas that can result in serious injury when the snap ring is removed from their top section due to extreme gas expulsion force. Safety glasses need to be worn throughout the process of center punching as well as drilling the shock absorber while you avoid any risks of puncturing the tube. Use a center punch to create a 10 mm (0.4 inch) indentation directly underneath the bottom of the tube. Secure the shock absorber horizontally in the vise while it is in its maximum extended position. After using a 5 mm (3/16 inch) drill bit to make holes at the center punch location, allow the gas or gas/oil mixture to escape through the holes while containing the oil with shop towels. A second indentation using a center punch should be placed in the middle of the tube before using the 5 mm (3/16 inch) drill bit to create a second hole while continuing to contain the escaping oil with shop towels. When ready to remove the shock absorber from the vise users should first drain the oil by holding it horizontally with the hole pointed downwards before performing rod movements in and out of the tube for full drainage completion.
Related 2000 Chevrolet Monte Carlo Parts
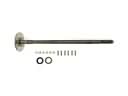 2000 Chevrolet Monte Carlo Axle Shaft
 2000 Chevrolet Monte Carlo Ball Joint
 2000 Chevrolet Monte Carlo Control Arm Bolt
 2000 Chevrolet Monte Carlo Control Arm Bracket
 2000 Chevrolet Monte Carlo Control Arm Bushing
 2000 Chevrolet Monte Carlo Crossmember Bushing
 2000 Chevrolet Monte Carlo Shock And Strut Mount
 2000 Chevrolet Monte Carlo Steering Knuckle
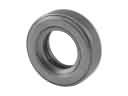 2000 Chevrolet Monte Carlo Strut Bearing
 2000 Chevrolet Monte Carlo Sway Bar Bracket
 2000 Chevrolet Monte Carlo Sway Bar Bushing
 2000 Chevrolet Monte Carlo Sway Bar Kit