ChevyParts
My Garage
My Account
Cart
OEM Buick Century Fuel Rail
Engine Fuel Rail- Select Vehicle by Model
- Select Vehicle by VIN
Select Vehicle by Model
orMake
Model
Year
Select Vehicle by VIN
For the most accurate results, select vehicle by your VIN (Vehicle Identification Number).
6 Fuel Rails found

Buick Century Fuel Rail Part Number: 17113256
$113.11 MSRP: $229.18You Save: $116.07 (51%)Ships in 1-2 Business Days
Buick Century Fuel Rail Part Number: 17113608
$119.91 MSRP: $225.16You Save: $105.25 (47%)Ships in 1-2 Business Days
Buick Century Fuel Rail Part Number: 17113607
Buick Century Fuel Rail Part Number: 17113268
Buick Century Fuel Rail Part Number: 17113195

Buick Century Fuel Rail Part Number: 17112643
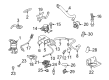
Buick Century Fuel Rail
Want to cut long-term maintenance and repair costs? Choose OEM Fuel Rail. Those parts deliver top durability you can trust. On our site, you'll find a huge catalog of genuine Buick Century parts. Prices are unbeatable, so you can keep more in your pocket. Every OEM Buick Century Fuel Rail includes a manufacturer's warranty. You can also get an easy return policy that keeps buying risk free. Fast delivery, get your car on the road quickly. It's simple to search, compare, and order. Stop guessing about quality or fit. Order today and save with parts that last.
Buick Century Fuel Rail Parts and Q&A
- Q: How to service the fuel rail on Buick Century?A:The first step to service the Fuel Rail involves carefully inspecting the left-hand Fuel Rail edition marked by eight identification digits that connects to cylinders 2, 4, and 6. Follow the o-ring installation rules because black o-rings fit above the other ones which have brown color despite their identical size. The fuel passages need protection from contaminants by covering all fittings and plugging all holes when performing maintenance. The first step requires fuel pressure reduction followed by lifting the upper manifold. You should disconnect the engine fuel feed pipe from the Fuel Rail end while also disconnecting the engine fuel return pipe from the Fuel Pressure Regulator end. Before further procedures remove both the fuel feed pipe o-ring and the fuel return pipe o-ring and disconnect the main injector harness electrical connector before pulling up the Fuel Injector connector lock release. Use your thumb to press down the Fuel Injector connector lock tab while pulling out the fuel injection harness from the Fuel Rail. Proceed to disconnect the electrical wiring of coolant temperature sensor while you remove the Fuel Rail retaining bolts. Lift all fuel injectors using the specific tool (J43013) to remove the Fuel Rail assembly. Every injector o-ring seal from its position at the spray tip section goes into disposal yet the o-ring back up stays intact for reuse. The Fuel Rail assembly requires tilting to position the injectors before bolt attachment to install with torques set to 10 n.m (7 lb ft). The coolant temperature sensor wiring must be hooked up before reattaching the injector wiring harness to the Fuel Rail followed by a proper lock of the injectors by pushing the slide lock into position. After connecting the main injector harness electrical connector you should install new o-rings on the fuel feed pipe and fuel return pipe followed by reinstalling the fuel feed pipe to the Fuel Rail while tightening the engine fuel feed pipe nut to 17 n.m (13 lb ft). Install the upper Intake Manifold while tightening the fuel filler cap then connect the fuel return pipe to the Fuel Pressure Regulator before securing the engine fuel return pipe nut to 17 n.m (13 lb ft). The maintenance process ends by connecting the negative Battery Cable before a leak inspection by turning the ignition on for two seconds followed by off for ten seconds and another lift of on to check for fuel leaks.
- Q: How to replace the fuel rail assembly on Buick Century?A:The eight-digit identification number on the left-hand Fuel Rail should be documented before replacement because it serves even cylinders 2, 4, and 6. It is crucial to mount fuel injector o-rings properly because the upper position goes to the black o-ring while the lower position belongs to the brown one since they have different materials though they maintain the same size. Football caps should cover the fittings while plugging holes to stop contaminated fluids from entering the system. Disconnection of the car's negative battery cable must be done first followed by lowering fuel system pressure. The proper service begins with disassembly of the upper Intake Manifold along with the fuel pipe retainer clip bolt and the engine fuel feed pipe from the Fuel Rail and the engine fuel return pipe from the Fuel Pressure Regulator. Disconnect the main fuel injector wiring harness connector before performing these procedures: removing the fuel feed and return pipe o-rings and pulling up the lock release of the fuel injector electrical connectors. First detach the wiring harness from the Fuel Rail before removing the Fuel Rail bolts to take off the assembly. Damage to any injector o-ring seals requires them to be discarded. During installation handle all fuel system components carefully while you slow contaminants from entering through plugging the Fuel Rail inlet and outlet ports. It is necessary to prevent both compressed air usage along with submerging the Fuel Rail assembly in solvent solutions. To install the new Fuel Injector O-Ring seals on each injector's spray tip end first grease them with clean engine oil and then put them into the Intake Manifold through its fitting angular position. Tighten the Fuel Rail bolts to 10 n.m (89 lb in) before restoring the ect sensor electrical connector and installing the fuel injector wiring harness with electrical connectors where the slide lock should be fully engaged. The procedure for this fix requires users to install new o-rings onto the fuel feed and return pipes before attaching the fuel feed pipe to the Fuel Rail with a torque setting of 17 n.m (13 lb ft). The fuel return pipe joins the Fuel Pressure Regulator after tightening its nut to 17 n.m (13 lb ft). Then install and tighten the fuel pipe retainer clip bolt to 25 n.m (18 lb ft). Fundamentally install the upper Intake Manifold before reattaching the negative battery cable and examine for fuel leakage through a testing sequence of 2-second ignition on and 10-second off intervals.


Related Buick Century Parts
 Buick Century Fuel Pressure Regulator
 Buick Century Fuel Pump
 Buick Century Fuel Tank
 Buick Century Fuel Injector
 Buick Century Air Filter Box
 Buick Century Air Hose
 Buick Century Fuel Injector O-Ring
 Buick Century Gas Cap
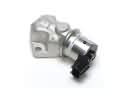 Buick Century Idle Control Valve
 Buick Century Throttle Body
 Buick Century Throttle Body Gasket
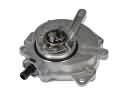 Buick Century Vacuum Pump