ChevyParts
My Garage
My Account
Cart
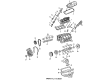
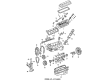
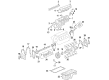
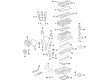
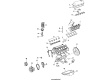
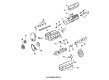
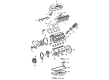
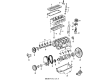
OEM Cadillac Pushrod
Valve Push Rod- Select Vehicle by Model
- Select Vehicle by VIN
Select Vehicle by Model
orMake
Model
Year
Select Vehicle by VIN
For the most accurate results, select vehicle by your VIN (Vehicle Identification Number).
9 Pushrods found


Cadillac Push Rods Part Number: 476525
$17.46 MSRP: $18.97You Save: $1.51 (8%)Ships in 1-2 Business DaysProduct Specifications- Other Name: Rod Assembly-Valve Push; Pushrod; Rod, Engine Valve Push Rod; Rod, Engine Valve Push


Cadillac Push Rods Part Number: 10241740
$15.16 MSRP: $23.75You Save: $8.59 (37%)Ships in 1-3 Business DaysProduct Specifications- Other Name: Rod, Engine Valve Push Rod; Pushrod


Cadillac Push Rods Part Number: 10238852
$18.77 MSRP: $30.90You Save: $12.13 (40%)Ships in 1-2 Business DaysProduct Specifications- Other Name: Rod, Valve Push; Pushrod; Rod, Engine Valve Push Rod


Cadillac Push Rods Part Number: 12619828
$3.87 MSRP: $9.12You Save: $5.25 (58%)Ships in 1-2 Business DaysProduct Specifications- Other Name: Rod, Engine Valve Push Rod; Pushrod

Cadillac Push Rods Part Number: 1618805
$6.40 MSRP: $8.42You Save: $2.02 (24%)Ships in 1-2 Business DaysProduct Specifications- Other Name: Rod Assembly; Pushrod; Rod, Engine Valve Push Rod

Cadillac Push Rods Part Number: 1487602
$13.11Product Specifications- Other Name: Rod; Pushrod; Rod, Engine Valve Push Rod; Rod, Engine Valve Push

Cadillac Push Rods Part Number: 10046173
$12.10 MSRP: $19.20You Save: $7.10 (37%)Ships in 1-3 Business DaysProduct Specifications- Other Name: Rod, Valve Push; Pushrod; Rod, Engine Valve Push Rod

Cadillac Push Rods Part Number: 1644842
Product Specifications- Other Name: Rod Assembly; Pushrod; Rod, Engine Valve Push Rod

Cadillac Push Rods Part Number: 14018769
Product Specifications- Other Name: Rod, Engine Valve Push Rod; Pushrod
Cadillac Pushrod
Choose OEM Pushrod, you're making the optimal decision for superior quality and perfect performance. You can feel confident because each component goes through stringent quality checks. Every part is carefully built to comply with Cadillac's factory specifications. You'll enjoy a smooth, worry-free installation that fits just right. At ChevyPartsGiant.com, you'll find it easy to get top-quality OEM Cadillac Pushrod. You can shop at highly competitive prices and protect your budget. All our genuine Cadillac parts include a dependable manufacturer's warranty. You'll also appreciate our straightforward return policy and swift delivery services for extra convenience.
Cadillac Pushrod Parts and Q&A
- Q: How to replace the pushrod and valve rocker arm on Cadillac Escalade?A:Start the valve Rocker Arm and push rod replacement by taking out the Rocker Arm cover while setting the rocker arms along with pushrods and pivot support in a rack to maintain their positioning. First remove the Rocker Arm bolts from their positions and subsequently remove the rocker arms together with the Rocker Arm pivot support before dealing with the pushrods. The cleaning and inspection process must be performed on the rocker arms and pushrods when needed for replacement. Engine oil should be used to lubricate both rocker arms and pushrods and the bolt flange of Rocker Arm bolts needs lubrication prior to installation. The Rocker Arm pivot support installation needs to be done after the pushrods arrest correctly in the valve lifter sockets followed by Pushrod installation to achieve proper Rocker Arm seat positioning but avoid bolt tightening at this time. To continue with the installation, set the Crankshaft at top dead center (TDC) compression position during which the number one rocker arms align off the lift curve and the Crankshaft key points to the 1:30 position. While engine position is at number one firing mode, you must tighten Exhaust Valve Rocker Arm bolts on cylinders 1, 2, 7, and 8 to 30 nm (22 ft. Lbs.) followed by Intake Valve bolts for cylinders 1, 3, 4, and 5 to 30 nm (22 ft. Lbs.). The torque specification requires 30 nm (22 ft. Lbs.) for all the exhaust Rocker Arm bolts of cylinders 3, 4, 5, and 6 and for all the intake bolts of cylinders 2, 6, 7, and 8. Screw in the Rocker Arm cover as the last step of installation.

Related Cadillac Parts
 Cadillac Oil Pan
 Cadillac Balance Shaft Gear
 Cadillac Camshaft Bearing
 Cadillac Coolant Filter
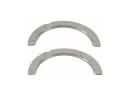 Cadillac Crankshaft Thrust Washer Set
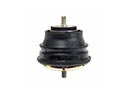 Cadillac Engine Mount
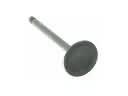 Cadillac Intake Valve
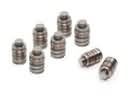 Cadillac Lash Adjuster
 Cadillac Motor And Transmission Mount
 Cadillac Oil Filler Cap
 Cadillac Piston Ring
 Cadillac Timing Chain Tensioner