ChevyParts
My Garage
My Account
Cart
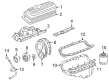
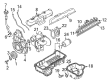
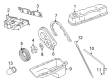
OEM Chevrolet Astro Intake Manifold
Engine Intake Manifold- Select Vehicle by Model
- Select Vehicle by VIN
Select Vehicle by Model
orMake
Model
Year
Select Vehicle by VIN
For the most accurate results, select vehicle by your VIN (Vehicle Identification Number).
13 Intake Manifolds found

Chevrolet Astro Intake Manifold Part Number: 17092021
$31.94 MSRP: $1362.73You Save: $1330.79 (98%)Ships in 1-2 Business Days

Chevrolet Astro Intake Manifold Part Number: 17113542
Chevrolet Astro Intake Manifold, Lower Part Number: 88894294
Chevrolet Astro Intake Manifold, Lower Part Number: 17113342
Chevrolet Astro Intake Manifold Part Number: 17113139
Chevrolet Astro Intake Manifold, Upper Part Number: 17095070
Chevrolet Astro Intake Manifold, Lower Part Number: 17094169
Chevrolet Astro Intake Manifold, Upper Part Number: 17093085
Chevrolet Astro Intake Manifold Part Number: 12552430
Chevrolet Astro Intake Manifold Part Number: 10172811
Chevrolet Astro Intake Manifold Part Number: 10172785

Chevrolet Astro Intake Manifold Part Number: 10039804
Chevrolet Astro Intake Manifold Part Number: 10031385
Chevrolet Astro Intake Manifold
Want to cut long-term maintenance and repair costs? Choose OEM Intake Manifold. Those parts deliver top durability you can trust. On our site, you'll find a huge catalog of genuine Chevrolet Astro parts. Prices are unbeatable, so you can keep more in your pocket. Every OEM Chevrolet Astro Intake Manifold includes a manufacturer's warranty. You can also get an easy return policy that keeps buying risk free. Fast delivery, get your car on the road quickly. It's simple to search, compare, and order. Stop guessing about quality or fit. Order today and save with parts that last.
The Intake Manifold in Chevrolet Astro is a component which evenly feeds air or possibly the air/fuel mixture to the cylinder head intake ports, consequently influencing the power and performance of the engine. Usually of plastic construction for lower weight and better thermal characteristics, the manifold may be in upper and lower halves connected by gaskets. Other elements found in various manifolds are coolant passages as well as the thermo stat location, and temperature and air charge sensors. Doing this improves the horsepower and torque since the flow of air and the mixture of fuel and power are well enhanced especially for engines that have been altered in some way. On average, Intake Manifold in Chevrolet Astro is crucial for its efficient and powerful functioning of the car's engine.
Chevrolet Astro Intake Manifold Parts and Q&A
- Q: What are the steps involved in the removal and installation of the fuel injector assembly and upper intake manifold on Chevrolet Astro?A:The weak retainers that secure the Fuel Injectors in the Intake Manifold will function properly during installation because the upper intake will fully seat the injectors so they cannot escape from their lower manifold position. The threads of the fuel meter body bracket bolt must be treated with threadlock (GM P/N 12345382 or Canadian P/N 10953489) if you plan to reuse the bolt. After application, install both the fuel meter body bracket and bolt and tighten them to 10 nm (89 lb.in.). Position the six injectors in the correct lower Intake Manifold bores through the sequence (3, 5, 1, 2, 4, 6) and verify proper seating and lock afterward. Fit the electrical connections of the injectors without interference while facing towards the center of the Intake Manifold and adjust them slightly inboard to prevent wire tension. Align the electrical injector connections to minimize wire tension while facing toward the center of the Intake Manifold structure. Modifiy connector direction toward the inside of the manifold to prevent wiring tension. Place a new gasket between the upper and lower intake manifolds before setting the upper Intake Manifold into the lower manifold groove. To reuse fasteners apply threadlock compound gm p/n 1234582 or canadian p/n 10953489 to upper Intake Manifold attaching studs before installation with a torque of 5 nm (44 lb.in.) on first pass and 9 nm (80 lb.in.) on the final pass. To install evap canister purge solenoid valve studs with reused fasteners, apply threadlock (GM P/N 12345382 or Canadian P/N 10953489) to the stud threads, then fasten the valve and studs with 10 nm (89 lb.in.) torque. Screw the engine wiring harness bracket and secure its nut using 12 nm (106 lb.in.) torque. After installing the new fuel seals (black O-rings) into the fuel meter body you should add the new spacer rings and flat washers before setting in the new fuel seals (yellow O-rings) and then install the oil-retention tools. Begin by inserting the fuel pipe into the fuel meter body before applying the fuel pipe retainer bracket onto the fuel pipe followed by fastening the fuel pipe retainer bracket nuts . To reuse the fastener apply gm p/n 12345382 or canadian p/n 10953489 threadlock on the fuel pipe bolt threads. Install the bolt and tighten fuel pipe bracket nuts to 3 nm (27 lb.in.) while torqueing the fuel pipe bolt to 6 nm (53 lb.in.). Install a new manifold absolute pressure (MAP) sensor seal onto the MAP Sensor before applying a small amount of clean engine oil to the seal. Next, insert the MAP Sensor into the upper Intake Manifold. Screw the Ignition Coil into position and thread the studs until torque reaches 12 nm (106 lb.in.). Apply gm p/n 12346004 or canadian p/n 10953480 sealant to the threads of the ect sensor plug or sensor before installing it into the lower Intake Manifold front section with a torque of 20 nm (15 lb.ft). Install the engine coolant Thermostat followed by the water outlet (1 or 2) and accompanying studs while tightening both to 25 nm (18 lb.ft). Set a fresh Throttle Body Gasket into the upper Intake Manifold groove before inserting the Throttle Body. To reuse fasteners apply threadlock gm p/n 12345382 or canadian p/n 10953489 onto Throttle Body attaching studs before installing the accelerator control cable bracket along with the studs and nuts. Torque all fasteners to the following specifications: accelerator control bracket studs to Intake Manifold 6 nm (53 lb.in.) and nuts to 12 nm (106 lb.in.) and Throttle Body attaching studs to 12 nm (106 lb.in.).
- Q: How to replace the lower intake manifold on Chevrolet Astro?A:The first step to replace a lower Intake Manifold is to disconnect the battery negative cable followed by engine cover removal. Start by draining the cooling system while removing the air cleaner assembly with the air cleaner outlet duct attached to the Throttle Body assembly. First disconnect the accelerator control cable that connects to the throttle shaft and bracket before cutting the cruise control cable off its attachments to the throttle shaft and bracket. The Intake Manifold requires removal of the PCV Valve Hose assembly from both its position at the Intake Manifold and the valve rocker arm cover. Also remove the nuts securing the a/c hose bracket and engine wiring harness bracket to their manifold studs. The next step requires disconnecting electrical connectors for the a/c compressor clutch and a/c high pressure cutoff switch and throttle position (TP) sensor and idle air control (IAC) motor and fuel meter body assembly connector and manifold absolute pressure (MAP) sensor and evap canister purge solenoid valve . Secure the engine wire harness to a safe location after removing the ground wire from the water outlet stud and the engine wiring harness bracket from the evap canister purge solenoid valve stud. Detach the following components from the Intake Manifold: evap canister purge valve alongside radiator inlet hose, heater hose, water pump inlet hose, and vacuum hose. Start by clearing the bolt that secures the transmission fluid filler tube to the accelerator control cable bracket then detach the accelerator control cable bracket from the Throttle Body and Intake Manifold. Start by removing the Distributor and disconnecting fuel supply and return pipes at the back of the Intake Manifold before removing the ignition control module (ICM). Access to the front Intake Manifold bolt requires drivers to remove the Drive Belt along with the a/c compressor side brace and to slightly loosen the power steering pump rear bracket nut before removing the oil filler tube bracket bolt and tube. After removing the front power steering pump bracket's bolts and nut you should leave the power steering pump and a/c compressor in place while pushing the bracket forward to reach the front Intake Manifold bolt. First clean all surfaces on the lower Intake Manifold before its removal. The Intake Manifold disassembly and assembly procedures must be followed when you decide to replace the manifold. Installation process begins with placing the lower Intake Manifold followed by repositioning the power steering pump mounting bracket for final installation of three bolts and nut as well as tightening them to 41 nm (30 ft. Lbs.). Install the a/c compressor side brace and bolts, tightening the side brace bolt to 25 nm (18 ft. Lbs.) use a torque wrench to tighten the side brace bolt to the generator bracket up to 25 nm (18 ft. Lbs.). Also tighten the side brace bolt to 25 nm (18 ft. Lbs.). Install the oil filler tube and bolt, tightening the bolt to 25 nm (18 ft. Lbs.)complete the Drive Belt installation procedure after finishing all steps. Position the engine directly at the top dead center of number one cylinder before you mount the evap canister purge valve and fuel supply and return piping at the Intake Manifold's rear position. Take out the plug for number one cylinder and turn the crankshaft to its compression position with marks (1,4) on the balancer lined up to alignment marks (2,3) on the front cover before reinserting the plug. Follow this sequence to complete the installation: first place the Distributor and icm and after that place the accelerator control cable bracket's studs and nuts onto the Intake Manifold and Throttle Body. Tighten all these elements to 12 nm (106 inch lbs.). Reconnect the vacuum hose to the Intake Manifold, install the transmission fluid fill tube and bolt to the accelerator control cable bracket, tightening the bolt to 6 nm (53 inch lbs.)the technician installed water pump inlet hose and heater hoses and radiator inlet hose. Connect all electrical connectors for the a/c compressor clutch as well as the a/c high pressure cutoff switch and throttle position (TP) sensor and idle air control (IAC) motor and fuel meter body assembly connector and manifold absolute pressure (MAP) sensor and evap canister purge solenoid valve to the engine wiring harness. Install the ground wire and nut to the water outlet stud, tightening the nut to 19 nm (14 ft. Lbs.), then install the nut and engine wiring harness bracket to the stud for the evap canister purge valve, tightening it to 8 nm (71 inch lbs.)secure the Intake Manifold stud with a torque setting of 12 nm (106 inch lbs.). If equipped, install the nut and a/c hose bracket to the Intake Manifold stud, tightening to 5 nm (44 inch lbs.)open the valve rocker arm cover and secure the PCV Valve Hose assembly to the Intake Manifold. The technician will reinstall the cruise control cable when present then mount it to the throttle shaft before anchoring it with the accelerator control cable bracket followed by installing the accelerator control cable. Complete cooling system refilling before installing the air cleaner outlet duct to the Throttle Body and air cleaner assembly then reconnect the battery negative cable while finishing with the engine cover installation.


Related Chevrolet Astro Parts
 Chevrolet Astro Fuel Injector
 Chevrolet Astro Fuel Pump
 Chevrolet Astro Mass Air Flow Sensor
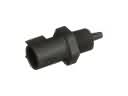 Chevrolet Astro Air Charge Temperature Sensor
 Chevrolet Astro Air Filter
 Chevrolet Astro Air Filter Box
 Chevrolet Astro Air Hose
 Chevrolet Astro Air Intake Coupling
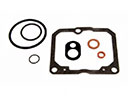 Chevrolet Astro Carburetor Gasket Kit
 Chevrolet Astro Fuel Tank Sending Unit
 Chevrolet Astro Intake Manifold Gasket
 Chevrolet Astro Throttle Cable