ChevyParts
My Garage
My Account
Cart
OEM Chevrolet S10 Crankshaft Gear
Crankshaft Timing Gear- Select Vehicle by Model
- Select Vehicle by VIN
Select Vehicle by Model
orMake
Model
Year
Select Vehicle by VIN
For the most accurate results, select vehicle by your VIN (Vehicle Identification Number).
5 Crankshaft Gears found

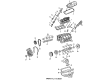
Chevrolet S10 Timing Gear Part Number: 477263
$18.35 MSRP: $36.83You Save: $18.48 (51%)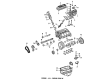
Chevrolet S10 Crankshaft Gear Part Number: 464617
$35.51 MSRP: $48.61You Save: $13.10 (27%)

Chevrolet S10 Timing Gear Part Number: 10101790
$59.74 MSRP: $119.95You Save: $60.21 (51%)
Chevrolet S10 Timing Gear Part Number: 10028052
$29.28 MSRP: $58.79You Save: $29.51 (51%)


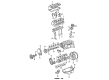
Chevrolet S10 Crankshaft Gear Part Number: 10083171
Chevrolet S10 Crankshaft Gear
Want to cut long-term maintenance and repair costs? Choose OEM Crankshaft Gear. Those parts deliver top durability you can trust. On our site, you'll find a huge catalog of genuine Chevrolet S10 parts. Prices are unbeatable, so you can keep more in your pocket. Every OEM Chevrolet S10 Crankshaft Gear includes a manufacturer's warranty. You can also get an easy return policy that keeps buying risk free. Fast delivery, get your car on the road quickly. It's simple to search, compare, and order. Stop guessing about quality or fit. Order today and save with parts that last.
The Chevrolet S10 Crankshaft Gear stands as a fundamental mechanism which strengthens both reliability and performance characteristics of Chevrolet S10 models. The gear functions as a vital timing component to match engine rocking motion with camshaft rotation for optimal S10 engine operations. Premium stainless steel constitutes the main material applied to create the Chevrolet S10 Crankshaft Gear which establishes its exceptional position within the automotive sector. The S10 crankshaft gear adapts to multiple generation types of S10 vehicles which allows it to serve as a strong choice for engine efficiency maintenance and safety needs. Regular installation procedures for the Chevrolet model Crankshaft Gear demand standard tools combined with sufficient care about details - thus highlighting its accessible characteristics. A correct fit of the Chevrolet automobile Crankshaft Gear stands as vital because engine failure might become inevitable when there is a mismatch between its dimensions or teeth structure. Its design elements allow the gear to excel in performance so it serves as a dependable choice between regular drivers and car enthusiasts. The the automaker car Crankshaft Gear proves its worth daily through its reliable operation which contributes to faultless model performance and provides drivers with reliable safety along with dependable performance.
Chevrolet S10 Crankshaft Gear Parts and Q&A
- Q: What tools are required to service and repair the crankshaft gear and sprocket on Chevrolet S10?A:To service and repair the Crankshaft Gear and sprocket, one will be needing the following tools. Crank shaft gear remover ( J 5825-A) and crank shaft gear installer (J 5590). The first step is to take off the engine front cover and the crankshaft position sensor reluctor ring. Install to rotate the engine, should be a 7/16-20 x 1 inch bolt at the end of the crankshaft making sure it is not the crankshaft balancer bolt or over an inch long and it will cause harm. Support the crankshaft with the socket wrench by holding it in place and rotate it all the way until the mark on the second sprocket is lined up with the first one and cylinder number four is up at top dead center (TDC) on the compression stroke. Next, unbolt the camshaft sprocket bolts, and then camshaft sprocket and Timing Chain. Replace the Crankshaft Gear remover (J 5825-A) to remove the crankshaft sprocket and extract the crankshaft balancer key. Clean and dry all components, checking out for cam Timing Chain wear damage to the cam sprocket as well as the engine crankshaft sprocket wear or damage. For installation, put the crankshaft balancer key into a crank keyway so that it is parallel, or slightly leans. Make the keyway of the crankshaft sprocket coincide with the balancer key and install it using the Crankshaft Gear installer (J 5590). Install the camshaft sprocket with its alignment mark at 6 o'clock, while both sprockets are to be aligned correctly at 12 o'clock and 6 o'clock respectively. If the camshaft sprocket bolts have been replaced, tighten them to 25 nm (18 ft. Lbs.) then install the crank shaft position sensor reluctor ring with the balancer key and utilizing the Crankshaft Gear installer (J5590) to seat it all the way in. Last but not least, pull off the bolt from the crankshaft and put the engine front cover on.

Related Chevrolet S10 Parts
 Chevrolet S10 Oil Filter
 Chevrolet S10 Cylinder Head
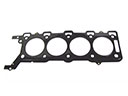 Chevrolet S10 Head Gasket
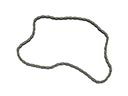 Chevrolet S10 Timing Chain
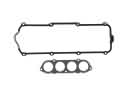 Chevrolet S10 Valve Cover Gasket
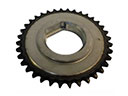 Chevrolet S10 Balance Shaft Gear
 Chevrolet S10 Cam Gear
 Chevrolet S10 Drain Plug
 Chevrolet S10 Harmonic Balancer
 Chevrolet S10 Lash Adjuster
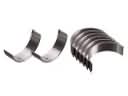 Chevrolet S10 Rod Bearing
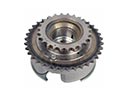 Chevrolet S10 Variable Timing Sprocket