ChevyParts
My Garage
My Account
Cart
OEM Chevrolet Tahoe Door Hinge
Interior Door Hinge- Select Vehicle by Model
- Select Vehicle by VIN
Select Vehicle by Model
orMake
Model
Year
Select Vehicle by VIN
For the most accurate results, select vehicle by your VIN (Vehicle Identification Number).
62 Door Hinges found


Chevrolet Tahoe Lower Hinge, Front Passenger Side Part Number: 20969646
$135.34 MSRP: $202.34You Save: $67.00 (34%)Ships in 1-2 Business Days


Chevrolet Tahoe Upper Hinge, Rear Passenger Side Part Number: 25854398
$70.74 MSRP: $105.29You Save: $34.55 (33%)Ships in 1-3 Business Days


Chevrolet Tahoe Upper Hinge, Front Driver Side Part Number: 25854415
$113.33 MSRP: $169.43You Save: $56.10 (34%)Ships in 1-2 Business Days

Chevrolet Tahoe Lower Hinge, Rear Passenger Side Part Number: 20876301
$80.83 MSRP: $120.31You Save: $39.48 (33%)Ships in 1-3 Business Days

Chevrolet Tahoe Lower Hinge, Rear Driver Side Part Number: 20876300
$80.83 MSRP: $120.31You Save: $39.48 (33%)Ships in 1-2 Business Days


Chevrolet Tahoe Upper Hinge, Front Passenger Side Part Number: 25854416
$114.86 MSRP: $171.72You Save: $56.86 (34%)Ships in 1-2 Business Days
Chevrolet Tahoe Hinge Assembly, Front Upper Driver Side Part Number: 19354136
$119.51 MSRP: $172.48You Save: $52.97 (31%)Ships in 1-2 Business Days
Chevrolet Tahoe Lower Hinge, Front Part Number: 19354133
$168.88 MSRP: $252.48You Save: $83.60 (34%)Ships in 1-2 Business Days
Chevrolet Tahoe Hinge Assembly, Rear Driver Side Part Number: 19354130
$159.94 MSRP: $239.11You Save: $79.17 (34%)Ships in 1-3 Business Days
Chevrolet Tahoe Hinge Assembly, Driver Side Part Number: 19354134
$110.61 MSRP: $136.09You Save: $25.48 (19%)Ships in 1-2 Business Days
Chevrolet Tahoe Hinge Assembly, Passenger Side Part Number: 12476452
$222.71 MSRP: $332.97You Save: $110.26 (34%)Ships in 1-2 Business Days
Chevrolet Tahoe Hinge Assembly, Driver Side Part Number: 19354125
$111.46 MSRP: $165.90You Save: $54.44 (33%)Ships in 1-2 Business Days
Chevrolet Tahoe Lower Hinge, Rear Part Number: 13581570
$62.66 MSRP: $93.27You Save: $30.61 (33%)Ships in 1-2 Business Days
Chevrolet Tahoe Lower Hinge, Rear Driver Side Part Number: 23396435
$36.25 MSRP: $53.96You Save: $17.71 (33%)Ships in 1-2 Business DaysChevrolet Tahoe Upper Hinge, Rear Lower Part Number: 13581571
$62.66 MSRP: $93.27You Save: $30.61 (33%)Ships in 1-2 Business Days
Chevrolet Tahoe Upper Hinge, Rear Driver Side Part Number: 23396437
$35.72 MSRP: $53.16You Save: $17.44 (33%)Ships in 1-3 Business DaysChevrolet Tahoe Lower Hinge, Rear Passenger Side Part Number: 23396436
$36.25 MSRP: $53.96You Save: $17.71 (33%)Ships in 1-2 Business Days
Chevrolet Tahoe Lower Hinge, Rear Part Number: 13581568
$101.33 MSRP: $150.81You Save: $49.48 (33%)Ships in 1-2 Business Days
Chevrolet Tahoe Upper Hinge, Rear Lower Part Number: 13581569
$97.27 MSRP: $144.78You Save: $47.51 (33%)Ships in 1-2 Business DaysChevrolet Tahoe Hinge Assembly, Passenger Side Part Number: 19354135
$111.52 MSRP: $165.98You Save: $54.46 (33%)Ships in 1-2 Business Days
| Page 1 of 4 |Next >
1-20 of 62 Results
Chevrolet Tahoe Door Hinge
Want to cut long-term maintenance and repair costs? Choose OEM Door Hinge. Those parts deliver top durability you can trust. On our site, you'll find a huge catalog of genuine Chevrolet Tahoe parts. Prices are unbeatable, so you can keep more in your pocket. Every OEM Chevrolet Tahoe Door Hinge includes a manufacturer's warranty. You can also get an easy return policy that keeps buying risk free. Fast delivery, get your car on the road quickly. It's simple to search, compare, and order. Stop guessing about quality or fit. Order today and save with parts that last.
The Door Hinge is a crucial part that can be seen to have the qualities of the premier brand since it is involved in enhancing the smooth running of the Tahoe doors. This Door Hinge fastens the door to the vehicle frame whereby the door can easily open and close which is safety and convenient. An efficiently working Door Hinge is significant for the Chevrolet Tahoe as it provides the car structural support and alignment problems of this part may affect the efficiency of the car. Available for Tahoe Models across the 5 generations, the Door Hinge is made to provide durability into the functionality of the car as well as its safety. It is advised that lubrication is done as often as possible because it helps in increasing the lifespan of the Door Hinge and also became of wear and tear. The Chevrolet Tahoe has nice powerful view and large size, it started from 1994 and the latest models of this car has powerful and new technology. It is strongly exercising stiffness and resistant engineering work so the Door Hinge is considered to be very special for the car and its reliability. Therefore, the Chevrolet Tahoe still retains the title as an ideal car for families and working individuals since it provides performance, safety, and flexibility in ways that other vehicles cannot. This Door Hinge is not reserved as just an ordinary working component; instead, it is the perfect representation of Chevrolet vehicles.
Chevrolet Tahoe Door Hinge Parts Questions & Experts Answers
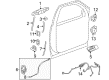
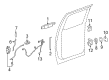
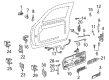
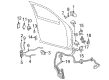
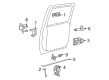
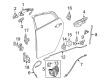
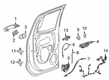
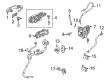
- Q: How to replace the front side door hinge on Chevrolet Tahoe?A:The first step is to remove all parts connected to the front side door and mark the area around the current hinge on the hinge pillar and only after that remove any excess adhesive there. Run the sandpaper across the hinge by hand to find the four spots that attach it to the pillar and then puncture the center of each of these spots to prepare for effective drilling. Make a center punch on each one of the four old weld marks, but do not drill into the door (1). Use a 13 mm rotabroach hole saw or its alternative to cut through the hinge base (2) at each position, then chisel away the hinge if it is stuck. Wash the area around the door to allow for a right fit of the hinge and then mend all the damage done while removing it. Get the hinge mounting areas of the backing plates ready, fit the hinge onto the scribed marks and carefully mark each hole location on the door with a center punch. After placing the center punches, make a 3 mm (1/8 in) hole at every spot, then drill out each 3 mm hole to make it 11.5 mm (29/64 in). Wash all the exposed metal areas, coat them with an acceptable anti-corrosion primer and seal the hinge area with full-bodied caulk. Place the hinge on one side and the backing plate on the other side of the door, thread in the bolts and tighten them to 25 N.m (18 lb ft). Non-stick sealers should be used on the metal and all necessary panels and components should be refinished; after which, everything is reinstalled and adjusted correctly. Installation of new doors also requires the same steps: first remove all the door-related panels, clean off any old adhesive, sand the existing hinge and mark the spot. Punch the weld marks, use a 13 mm (1/2 in) rotabroach to drill through the bottom of the bed (2) and then detach the hinge. First, clean the surface of the pillar, deal with any issues, put on the service hinge and use center punches to find each stud location. First drill a pilot hole of 3 mm (1/8 in) and afterwards make a hole of 11.5 mm (29/64 in) for the studs. Clean the bare metal sections, treat them with anti-corrosion primer and insert fish wire (1), GM P/N 15017229, both through the hinge and the pillar. Take the stud (2), GM P/N 15017230 and insert it into the wire end, align it properly and finally mount it with the provided nuts GM P/N 11516746. Do the same for all the rest of the studs, remove the nuts, apply caulk under the hinges where they attach to the frame, connect the hinge (2) to the pillar (3) with the supplied nuts and tighten using 25 N.m (18 lb ft). Make surfaces clean and fit for refinishing, coat them with sealers and put back all the panels and components.

Related Chevrolet Tahoe Parts
 Chevrolet Tahoe Door Handle
 Chevrolet Tahoe Door Lock Actuator
 Chevrolet Tahoe Window Motor
 Chevrolet Tahoe Door Lock
 Chevrolet Tahoe Door Moldings
 Chevrolet Tahoe Door Seal
 Chevrolet Tahoe Liftgate Hinge
 Chevrolet Tahoe Tailgate Handle
 Chevrolet Tahoe Tailgate Lift Support
 Chevrolet Tahoe Trunk Latch
 Chevrolet Tahoe Weather Strip
 Chevrolet Tahoe Window Crank Handles