ChevyParts
My Garage
My Account
Cart
OEM Chevrolet Uplander Control Arm Bushing
Suspension Arm Bushing- Select Vehicle by Model
- Select Vehicle by VIN
Select Vehicle by Model
orMake
Model
Year
Select Vehicle by VIN
For the most accurate results, select vehicle by your VIN (Vehicle Identification Number).
4 Control Arm Bushings found


Chevrolet Uplander Axle Beam Bushing, Rear Part Number: 15829134
$15.84 MSRP: $26.09You Save: $10.25 (40%)

Chevrolet Uplander Lower Control Arm Bushing, Front Part Number: 10260991
$15.09 MSRP: $24.69You Save: $9.60 (39%)
Chevrolet Uplander Lower Control Arm Front Bushing Part Number: 10412124
$22.91 MSRP: $37.72You Save: $14.81 (40%)Ships in 1-2 Business Days
Chevrolet Uplander Lower Control Arm Bushing Part Number: 10412924
Chevrolet Uplander Control Arm Bushing
Want to cut long-term maintenance and repair costs? Choose OEM Control Arm Bushing. Those parts deliver top durability you can trust. On our site, you'll find a huge catalog of genuine Chevrolet Uplander parts. Prices are unbeatable, so you can keep more in your pocket. Every OEM Chevrolet Uplander Control Arm Bushing includes a manufacturer's warranty. You can also get an easy return policy that keeps buying risk free. Fast delivery, get your car on the road quickly. It's simple to search, compare, and order. Stop guessing about quality or fit. Order today and save with parts that last.
Chevrolet Uplander Control Arm Bushing is usually a control arm bushing; it is a vital part of the auto suspension system widely recognized for its dependability and operating capacity. This Control Arm Bushing is particularly made for the Chevrolet Uplander units manufactured from 2005 up to 2009 The component is instrumental in dampening shocks and reducing rubbing stresses in between the control arm and the car's chassis. This creates a better control and handling of the car; also, it reduces the chances of an accident by providing smooth control arm movements to the Uplander. The Chevrolet Uplander Control Arm Bushing is available with different types of the Uplander including the Short Wheel Base (SWB) and the Long Wheel Base (LWB) hence can be used interchangeably. Rubber, polyurethane and synthetic elastomers are used in the Control Arm Bushing to deliver the enhancement of durability and performance and it is available in standard or hi-performance types. This flexibility is not only beneficial to the operation of the Chevrolet Uplander but is also useful in prolonging the durability of the suspension systems. Also, the Control Arm Bushing design prevents side to side wheel movement helping in improved safety on the road. Being made from materials that prioritize durability while having the ability to supply effective vibration damping, the Chevrolet Uplander Control Arm Bushing is an excellent player in the automotive market that can give many car owners the security of ascertaining their vehicle's high performance.
Chevrolet Uplander Control Arm Bushing Parts and Q&A
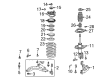
- Q: How to replace the front lower control arm bushing on Chevrolet Uplander?A:To remove the front lower Control Arm Bushing, take out the following tools: Control Arm Bushing set (J 21474-01), sprocket bearing remover (J 34126), front knuckle support (J 35379) and extreme pressure lubricant-1/4 ounce tube (J 23444-A). Start the procedure by removing the lower Control Arm and locking it into a vice. Mark the lower Control Arm by the flat edge of the bushing flange, and apply j 23444-a on the threads of puller bolt thrust bearing (J 21474-27). Put together the bushing removal tools which include: the puller bolt thrust bearing (J 21474-27), Control Arm Bushing installer (J 21474), sprocket bearing remover (J 34126), front knuckle support (J 35379), bushing installer remover (J 21474-2), and 1/2 inch nut (J 21474-4). Tighten 1/2 inch nut (J 21474-4) until the bushing falls off the Control Arm, then disassemble the tools. For installation, make sure the lower Control Arm is arranged precisely to the original vehicle ride and handling. Placing the flat edge of the bushing flange in the mark on the Control Arm exactly 30 degrees off the center line, with the thin slot oriented in the outboard direction. Reinsert the bushing into the Control Arm, applying j 23444-a on the threads of puller bolt thrust bearing (J 21474-27) as well. Make sure all installation tools are assembled, which include puller bolt thrust bearing (J 21474-27), Control Arm Bushing installer (J 21474), Control Arm Bushing receiver (J 21474-5), and 1/2 inch nut (J 21474-4). Tighten the 1/2 inch nut (J 21474-4) to seat the bushing, take apart the tools and finally install the lower Control Arm.
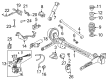
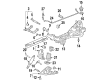
- Q: How to Replace a Control Arm Bushing on a Solid Rear Axle on Chevrolet Uplander?A:Rear axle maintenance starts by lifting the vehicle for support then positioning a utility stand to hold the Control Arm slightly in front of the coil spring. First remove the rear axle bolts from the Control Arm and then use a utility stand to lower the axle to get to the Control Arm bushing. Begin by recording the Control Arm bushing's position on the lower arm before using the rear suspension bushing remover/installer (3GJ 28685) paired with the ball joint remover/installer kit (3GJ 9519-E) to uninstall the bushing. The flat section of the new bushing needs to face the fluid axis at a 90-degree angle that is nine degrees off from the Control Arm's centerline during installation. Use the same tools of rear suspension bushing remover/installer (3GJ 28685) and ball joint remover/installer kit (3GJ 9519-E) to install the bushing which must reach 30 mm (1.18 in) beyond the Control Arm. The bushing requirements call for installation completion once its end points at the indicator line marked on the j28685. Install the bolt to the rear axle by raising it with the utility stand while the vehicle is lowered.


Related Chevrolet Uplander Parts
 Chevrolet Uplander Sway Bar Link
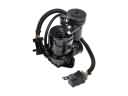 Chevrolet Uplander Air Suspension Compressor
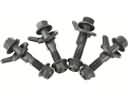 Chevrolet Uplander Alignment Bolt
 Chevrolet Uplander Axle Beam Mount
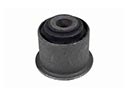 Chevrolet Uplander Axle Pivot Bushing
 Chevrolet Uplander Crossmember Bushing
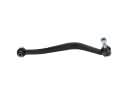 Chevrolet Uplander Lateral Arm
 Chevrolet Uplander Shock Absorber
 Chevrolet Uplander Suspension Strut Rod
 Chevrolet Uplander Sway Bar Bracket
 Chevrolet Uplander Sway Bar Bushing
 Chevrolet Uplander Sway Bar Kit