ChevyParts
My Garage
My Account
Cart
OEM GMC Savana 3500 Fuse Box
Fuse Holder Box- Select Vehicle by Model
- Select Vehicle by VIN
Select Vehicle by Model
orMake
Model
Year
Select Vehicle by VIN
For the most accurate results, select vehicle by your VIN (Vehicle Identification Number).
18 Fuse Boxes found


GMC Savana 3500 Junction Block Part Number: 25888305
$194.31 MSRP: $263.74You Save: $69.43 (27%)Ships in 1-3 Business Days

GMC Savana 3500 Junction Block Part Number: 23104896
$174.45 MSRP: $274.48You Save: $100.03 (37%)Ships in 1-3 Business Days
GMC Savana 3500 Junction Block Part Number: 22737795
$183.17 MSRP: $288.21You Save: $105.04 (37%)Ships in 1-3 Business DaysGMC Savana 3500 Junction Block Part Number: 85145018
$208.35 MSRP: $361.26You Save: $152.91 (43%)Ships in 1-3 Business DaysGMC Savana 3500 Junction Block Part Number: 85145017
$134.92 MSRP: $212.29You Save: $77.37 (37%)Ships in 1-3 Business DaysGMC Savana 3500 Junction Block Part Number: 84816379
$77.15 MSRP: $120.82You Save: $43.67 (37%)Ships in 1-3 Business DaysGMC Savana 3500 Junction Block Part Number: 84184430
$209.01 MSRP: $328.86You Save: $119.85 (37%)GMC Savana 3500 Junction Block Part Number: 84184429
$173.91 MSRP: $273.63You Save: $99.72 (37%)Ships in 1-3 Business DaysGMC Savana 3500 Junction Block Part Number: 84184428
$170.46 MSRP: $268.22You Save: $97.76 (37%)Ships in 1-3 Business DaysGMC Savana 3500 Junction Block Part Number: 15930141
$133.74 MSRP: $210.45You Save: $76.71 (37%)Ships in 1-2 Business Days
GMC Savana 3500 Junction Block Part Number: 22786561

GMC Savana 3500 Junction Block Part Number: 25930729
$196.49 MSRP: $309.17You Save: $112.68 (37%)
GMC Savana 3500 Junction Block Part Number: 25888290
$236.60 MSRP: $372.28You Save: $135.68 (37%)

GMC Savana 3500 Junction Block Part Number: 15930149
$499.58 MSRP: $789.60You Save: $290.02 (37%)GMC Savana 3500 Junction Block Part Number: 85145016
GMC Savana 3500 Junction Block Part Number: 84983380
GMC Savana 3500 Junction Block Part Number: 84983378
GMC Savana 3500 Junction Block Part Number: 84184393
GMC Savana 3500 Fuse Box
Want to cut long-term maintenance and repair costs? Choose OEM Fuse Box. Those parts deliver top durability you can trust. On our site, you'll find a huge catalog of genuine GMC Savana 3500 parts. Prices are unbeatable, so you can keep more in your pocket. Every OEM GMC Savana 3500 Fuse Box includes a manufacturer's warranty. You can also get an easy return policy that keeps buying risk free. Fast delivery, get your car on the road quickly. It's simple to search, compare, and order. Stop guessing about quality or fit. Order today and save with parts that last.
GMC Savana 3500 Fuse Box Parts Questions & Experts Answers
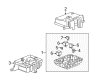
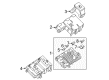
- Q: How to replace the Fuse Box in the Body Wiring Harness Junction Block on GMC Savana 3500?A:Before replacing the body wiring harness Fuse Box, the operator must first disconnect the negative Battery Cable then remove the driver seat. Begin by releasing the Fuse Box cover and unfastening both the positive Battery Cable nut as well as the cable from the Fuse Box. You should detach all the electrical connectors when using yf7 on the Fuse Box. Users must loosen the Fuse Box caged bolts to their full extent to expose Fuse Box base tabs which can be released for Fuse Box removal. Start by taking off the Fuse Box base nuts (1, 3) along with the wiring harness from the Fuse Box base. After that, remove the Fuse Box base itself off the floor. Install the wiring harness to the Fuse Box base before you mount it on floor studs while ensuring that other electrical connectors (4 and 5) remain outside of the Fuse Box base area. Install Fuse Box base nuts to floor studs after positioning them at proper locations. Fasten these nuts until they reach 5 n.m (44 lb in). Start by mounting the Fuse Box onto the Fuse Box base with retaining tabs completely seated in place and secure the bolts to 5 n.m (44 lb in). Follow the yf7 electrical connector procedure or use the positive Battery Cable to connect to the Fuse Box by installing its nut and tightening it to 10 n.m (88 lb in). After installing the Fuse Box cover the driver should reinstall their seat while reattaching the negative Battery Cable.

Related GMC Savana 3500 Parts
 GMC Savana 3500 ABS Relay
 GMC Savana 3500 Battery Fuse
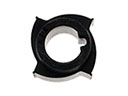 GMC Savana 3500 Distributor Reluctor
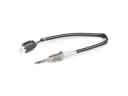 GMC Savana 3500 Exhaust Gas Temperature Sensor
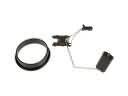 GMC Savana 3500 Fuel Level Sensor
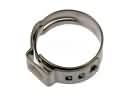 GMC Savana 3500 Fuel Line Clamps
 GMC Savana 3500 Fuel Pump Relay
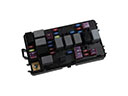 GMC Savana 3500 Fuse
 GMC Savana 3500 Headlight Relay
 GMC Savana 3500 Relay
 GMC Savana 3500 Shift Linkage Boot
 GMC Savana 3500 Throttle Position Sensor